Friday, 11 October 2013

Two tone tote bag tutorial


What you'll need: 

3 fabrics - 2 outer fabrics (or one if you prefer) and 1 fabric for lining.
Interfacing (if your fabric is lightweight)
8x 6-9mm rivets
Magnetic clasp (optional)
Basic sewing supplies (sewing machine, scissors, tailors awl, hammer, iron and ironing board, etc)


Cutting:

Lining and interfacing- 43cm x 86cm each
Handles- 2x 8cm x 60cm
Lower outer strip- 43cm x 45cm (if you only have one outer fabric, cut 1 piece of 43cm x 89cm)
Upper outer strip- 2x 43cm x 22cm (you don't need this if you are using only 1 outer fabric)


1. Piece the outer section:
(Skip this part if you are using 1 outer fabric)

Place one upper strip rights sides together with the lower outer strip, matching the raw edges on the 43cm side. Sew them together with a 1cm seam allowance. Repeat on the other side of the lower outer strip so the 3 pieces are sewn together to make one long strip.

Press the seam allowances towards the upper strips. Topstitch on the right side of the fabric approx. 2mm away from the seamline (on the upper strip so you are sewing through the seam allowance). Repeat for the other seam.

Place the rough side of the interfacing (if you are using it) onto the back of the section you have just finished. It should be positioned in the middle, won't reach the edges of the fabric. This is to reduce bulk.

2. Sew the side seams:

Fold the outer section in half, right sides together, so the seams where the upper and lower sections join are matching at both sides. Pin. Sew along both sides, leaving a 1cm seam allowance. The other 2 sides should be a folded edge and an open edge for the top of the bag.

Repeat this step for the lining, but leave an additional 6cm gap in one of the side seams. Make sure the gap is in the middle of the side and not too close to the top edge or bottom corner. This gap is to turn the bag through to the right side later.


3. Square off the corners:

To flatten the base of the bag, you need to square off the 4 corners. First take one corner of the outer bag, and make a triangle with the side seam and bottom fold in the center. Measure 7cm from the tip of the triangle and draw a line across. Pin and sew across the line. Repeat for the remaining 3 corners.


4. Add a clasp (optional):

If the want to add a clasp (the one I've used is a no-sew magnetic clasp) do so now. Measure 3cm down from the top edge of the outer bag and follow the instructions on the packet to add your clasp.


5. Prepare the handles:

Fold in the 4 raw edges by approx. 0.5cm to the wrong side. Press and pin if necessary. Then fold in half (wrong sides together), lengthways, press and pin. Topstitch along both long edges approx. 2mm from the edge. Secure the threads at both sides. Repeat for the other handle. Keep aside for later.


6. Sew the bags together:

Turn the lining bag, right side out. Keep the outer bag inside out. Insert the lining into the outer bag so the top raw edges are even, the side seams are matching and the right sides of the fabrics are together. Pin. Remove the arm from your sewing machine and fit the top opening of the bag either side of the machine so you can sew all the way around the top. Leave a 1cm seam allowance.


7. Turn to the right side:

Once you have sewn around the top edge of the bag, pull the lining out and turn the bag to the right side through the hole. Poke out all the corners before sewing the hole shut. When sewing the hole, push the seam allowance to the inside, and stitch very close to the edge, securing the stitching at both ends of the gap. Push the lining to the inside.


8. Topstitch:

Top stitching secures the lining into place and creates a clean upper edge. For this bag, the lining is slightly shorter than the outer bag, so push the lining down so the bases meet. This should bring the outer fabric (and your clasp if you have one) to the inside by 3cm. This makes sure that you can't see the lining fabric from the outside. Make sure it is even all the way around, pin and put the bag on your machine as you did before. Sew all around the top edge, approx. 2mm from the upper edge. Be careful where the clasps are attached (if the needle hits the clasp it will break).




9. Attach handles:

To attach the handles you will need a fabric marker, ruler, rivets, a tailors awl and a hammer. Lay the bag flat, with the seams at the sides. With your ruler and marker, position your first handle where you want it (approx. 6cm in from the side and 4cm down from the top. Mark. Make sure the handle is not twisted.

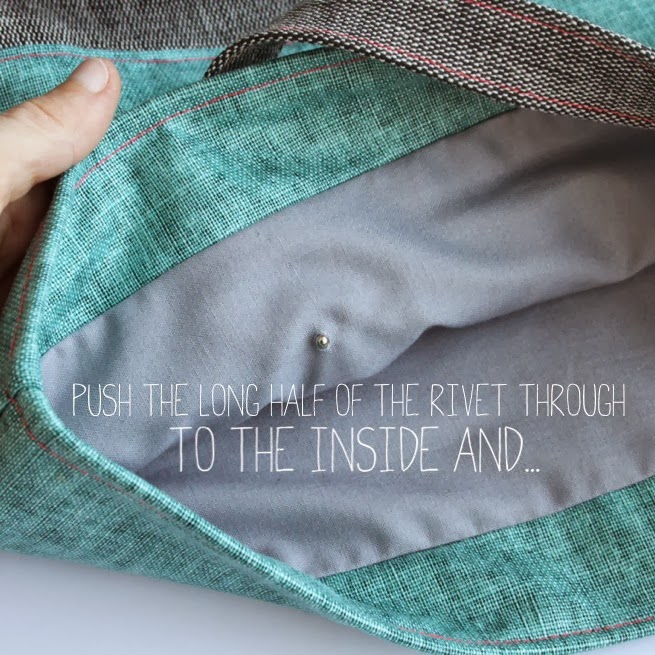
Use the tailors awl to pierce a hole through the handle, outer fabric and lining. You will need to make two holes, close to the bottom edge of the handle, and on both sides (the rivets will only be a couple of mm's apart). Take the long part of the rivet and push it through the hole through to the inside of the bag. Then attach the small part of the rivet in the back to secure. Repeat for the other rivet and make sure the handle is straight. Then take the hammer and lightly hit the rivet until it is tight against the fabric. Repeat for the other end of the handle and on the other side of the bag.

Note: when hammering the rivets, don't hit too hard as the rivets will bend out of shape.

Done!

Tuesday, 1 October 2013

I love 'Inkkit'!

My 'Inkkit' order has arrived!


Yay! I love it when you order something online and when it arrives, it's even better than you thought (it doesn't happen often!).

I love stationary and I love wrapping things up, so, naturally, I love 'Inkkit', home of 'eclectic packaging'. Twig pencils dipped in gold, white and black paint, beautifully delicate doilies (who doesn't like a doilie?!) and super sparkly glitter stickers to name a few of their treasures. I'm thinking brown kraft paper secured with twine, metallic washi tape and a neon tag or glassine bags secured with a huge glitter sticker. Whatever it is, when Inkkit is involved, you can't help be stylish. If you want to indulge your love of pretty packaging, visit the 'Inkkit' Etsy shop here. With 'Inkkit' and 'Breaking Bad' coming coming from the same place, who knew Albuquerque was so cool!


Beautiful hand painted twig pencils


Go monochrome...


Add sparkle!

Monday, 30 September 2013

Zipper purse tutorial


What you'll need:
2 fabrics
Interfacing or fusible batting
Thread
Zipper
Basic sewing supplies (sewing machine, zipper presser foot, iron, pins, scissors)


Cutting:
Lining fabric - 2 pieces of 23cm x 19cm
Outer upper strip - 2 pieces of 23cm x 9.5cm
Lower upper strip - 2 pieces of 23cm x 12cm
Zipper tabs (same as upper strip fabric) - 2 pieces of 2.5cm x 7.5cm
Interfacing or batting - 2 pieces of 21cm x 17cm (with the corners trimmed off)


1. Cover the zipper ends:

Take the two zipper tabs and fold in the short ends by 1/4inch and press. Then fold in half and press.

Place the end of the zipper tape up into the fold, and do 2 lines of stitching across to secure. If using a metal zipper, be careful that the needle does not hit the zip as it will break. To sew across the side with the zipper pull, you will need to open the zipper. Use some pins to secure the tape so it doesn't come apart whilst you are sewing.

Trim the excess fabric from the sides in line with the zipper tape. Then cut the tab along the fold line. Fold the two sides of the tabs back and trim the zipper ends. Don't cut too close to your stitching as zipper tapes fray easily and it will come away from the stitching.

You zip should now measure exactly the same as your fabric (23cm). If it doesn't, trim either the zip or the fabrics to match.


2. Sew the outer strips together:

Place one upper outer strip and one lower outer strip right sides together along the 23cm side, making sure the raw edges match. Sew across, leaving a 1cm seam allowance.

Press the seam to one side. With the right side facing up, topstitch (increase the stitch length slightly for this) approx. 2mm from the seam line, catching the seam and one strip. This keeps the seam flat. I chose bright pink thread as a decorative stitch. Repeat for the other 2 strips.


3. Fuse batting/interfacing:

Trim the corners off the batting or interfacing. This is to de-bulk so you can get sharp corners at the end.

Fuse to the wrong side of the outer panels. The interfacing/batting is cut slightly smaller than the fabric so place it in the middle of the fabric. This is so the seams are less bulky. The rough side of the interfacing/batting is the adhesive side and so should be placed onto the back of the fabric. Light weight interfacings can melt easily under the iron so use a pressing cloth or turn the panel over and iron on the fabric side. Some interfacings need quite a lot of heat to fuse so don't give up if it's not sticking. Interfacing or batting is not essential but gives the purse a bit more stability.
Note: I fused my batting to the lining fabric as my outer fabric is heat sensitive.


4. Sew the zip on:

Attach your zipper foot onto your machine now. Notice that the zipper foot has two bars (one on the left, one on the right) that can attach to the machine, unlike the normal presser foot. This is to sew on different sides of the zip. Attach it on the left bar for now. When you have the foot attached on the left side you should always sew with the zipper teeth on the left side of the foot. This is so the foot runs alongside the zipper teeth and not on top. Be careful that your needle is in the correct position and doesn't hit the foot or the zipper teeth.

Place your zip, right side down onto your upper fabric strip so they are right sides together and the edges are aligned (the zipper pull should be on the right hand side). Then place the lining fabric on top, right sides down. Pin along the edge. Using a fabric glue stick is also quite handy here.

Stitch the three layers together. You should aim to stitch about 8mm (very precise!) from the raw edge. If you stitch too close to the zipper teeth, the fabric will get caught in the zip and won't open. When you get about to about 7cm from the edge, stop and open the zip, then continue stitching to the end. The reason for this is that you won't be able to stitch straight past the zipper pull as it gets in the way.

Once you have done this flip the fabrics over so they are wrong sides together and press the fabric along the seam. Topstitch along, catching the 2 layers of fabric and the zipper tape, approx. 2mm from the seam. Again, you can increase the stitch length slightly for this. Repeat for the other side of the zipper - remember, the outer fabrics should always be right sides together and the lining fabrics should be together. If they are not the. Something is in the wrong place.


5. Sew around the edge:

Open the zip to half way.

Flip the fabrics over so that the lining fabrics are right sides together and so are the outer fabrics. The zip should now be in the middle. To flatten the zipper you need to push it into a U shape, with the bottom of the U coming towards the lining. This is important. Pin to secure all the way around. If you haven't sewn both sides of the zip exactly the same, the fabrics might not be lining up perfectly. You can trim them slightly but try not to trim too much off the sides as you need the tabs to stay the size they are to get nice corners.

Sew around the four edges with a 1/4inch seam allowance (don't make the seam allowance too much bigger than this). Leave a 2inch gap in the bottom of the lining piece so you can turn it the right way out later.

* If you want a flat purse, skip the next step.


6. Square off the corners:

To create a flat base, you need to square the corners.

Pick either one of the lining or outer corners and make a triangle so that the side seam and the base seam are matched up and in the centre of the triangle. To match the seams up perfectly, snip the seam allowance at the corner to allow the seams to be pushed in opposite directions then pin.

Measure 1.5inches from the tip of the triangle and draw a line across (the deeper into the triangle you stitch across, the wider the base of the purse). Trim the excess fabric off, leaving a 1cm seam allowance. Repeat for the remaining 3 corners.


7. Turn through:

Open the zipper the whole way and turn the purse through the hole that you left in the lining so that it is right side out.Stitch the hole closed. Push the lining inside. Use your fingers to pop out the top corners where the zipper ends are (it will feel stiff)

Done! Try with laminate fabrics to make a washable makeup bag!

Saturday, 28 September 2013

Applique Tutorial


What you'll need:

  • Background fabric (Something quite plain so your applique will be clear)
  • Fabric for applique (This can be more patterned)
  • Fusible web
  • Co-ordinating thread (I usually go slightly darker than my applique fabric to create a strong outline, but you can blend with your fabric so mistakes are less visible!)
  • Template (Draw your own or print a picture from the internet. Remember you will have to sew around this so keep it simple! Another reason to keep it simple is so that it is easily recognisable from an outline.)
  • Basic sewing supplies (Sewing machine, scissors, pencil, pins, iron)


Template tips


1. Once you have chosen your template, trace the outline onto the paper side of your fusible web (remember your image will be reversed). Then trim roughly around the outline. Iron the fusible web onto the wrong side of your applique fabric (the rough side of the fusible web is the adhesive side). Cut your shape out, peel the paper off the back, place it on your background fabric and iron it in place.


2. You have a few choices when it comes to selecting a stitch. You can use straight stitch to stitch around the shape (about 2mm  from the edge, inside the shape)to get a messier look as the raw edge is still visible. You can use a zig zag stitch so the needle drops equally on either side of the raw edge (you can adjust your stitch length so it is very small so that the raw edge is completely sealed under the stitch), or you can use a blanket stitch, which is what I've gone for. Blanket stitch gives a neater finish as the raw edge is sealed in the stitch.


3. I have chosen a slightly brighter thread than the colour of my fabric so it gives the shape a bolder outline. When using blanket stitch, try to keep the straight line part of the stitch perfectly in line with the raw edge of your shape. When sewing curves, make sure that your machine has finished one full stitch and your needle is back on the raw edge of the fabric. Then make sure your needle is in the down position, raise the presser foot and pivot the fabric. 

You can adjust the size of the stitch according to the size of the shape by altering the stitch width and length. I made the stitch length and width smaller when I was going around the paws and tail of the dog to get a neater finish. Try a practice piece first - blanket stitches are different on each machine! 

To secure your threads, either do a couple of back stitches at the beginning and end, or thread your top threads into a needle, take them to the back of your fabric, tie them in a not and trim.


Finished!